Thursday, August 23, 2012

Personalized wedding plates

I have a friend getting married in 2 days! How exciting! And I wanted to something special for them and I still wanted to be personal, without going super expensive!

So I decided to make a personalized plate with their names!

Tada!!!!

 
It's not as pretty as I wanted, (I'm a perfectionist, as I've mentioned before)

But I still love it! :)

But then I wanted to wrap it pretty, but didn't have a cute box, or cardboard to make one, and I didn't know what I was gonna do! O dear!

So I found some candy cane striped paper and cut a thin strip, wrapped some lace, and tied it all together with a white ribbon! :) What'd ya think?!

 
 I actually like how it turned out! :) You can't see the names under the paper, but that's ok :) I still need to make a little tag so they know who it's from and all that good stuff!

I ended up liking it so much I made one for us! Except I just used our Last Initial :)
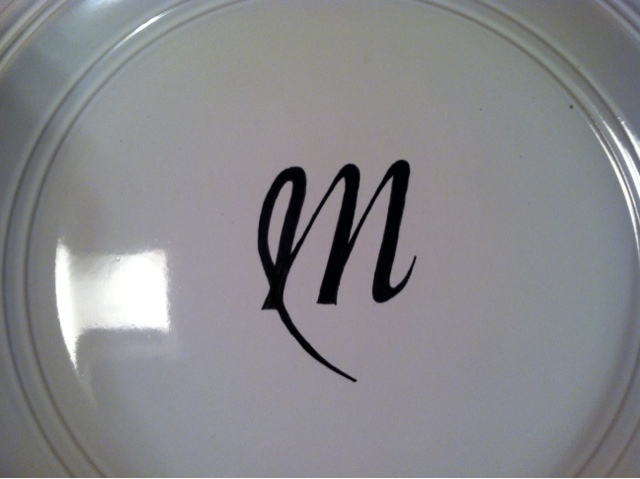
Pretty right? LOVED how it turned out! :)

BTW, if your wondering how to do it, she gives an excellent tutorial!

I also did our name on a glass baking dish, but I'll show how to do that later! :)

Have a fantabulous day!

How to only have to buy fabric softner sheets once for 2 whole year!

 ya you read that right!

My mom used to do this when we were little and it would help stretch the dryer sheets to last longer!

With a family of 6, mom was always finding ways to save money!

It's pretty simple actually :)

we buy a box of 160 sheets for like $4 and....


Just cut them in half! then you have 320!!! and I've never had a load come out all stat-icy yet!

So it does work!

So if you do 2 loads a week for a year (104) you'll have plenty! If you do 3 loads (156) You still have plenty! Now I know you're probably thinking *If I just buy one with 160 sheets I won't have to buy one for a year!* But who doesn't love to save money?! 

Am I the only one? Well I don't think so! lol :) But do whatever you want! lol :)

Or you could buy the box with 80 sheets and cut it in half and have 160! It's totally up to you! :) I just love not having to buy them! :)

And it does work on large loads too! I hate doing laundry so I have a habit of trying to get everything in only 2 loads (my hubby and I) and I usually fill my machines up pretty full!

Thank the sweet Lord that we have a heavy duty washer and dryer for maximum capacity! :)

We were blessed to be able to get them both for $100! and we also got a fridge for $50!
So all our major appliances we got for $50 each! Pretty sure we've been blessed big time!

We'll have been married for 2 years in September! :) And I just had to buy more sheets today... Pretty awesome if I don't say so myself! :)

Anyway! Have a fantabulous day!

Tuesday, August 21, 2012

Homemade bagels :)

I'm in the process of trying my hand at homemade bagels! :) I'm thinking I should have made the bagel hole a little smaller... Maybe I'll make a ball next time and then just poke or cut a hole in it! Lol :)

Lemme know what you guys do!

Friday, August 17, 2012

We've officially moved!!!!

Sorry I've been so absent! We've been busily working trying to get our new house all fixed up so we could move in :) I'll be sure to show you pictures as we go :)

Anyway have a great day and well talk later!

Friday, August 10, 2012

Diy Off Brand Swiffer Mop Pads (Libman)

Well I've been experimenting with making some pads for my mop :) its like a Swiffer mop but a different brand... Libman is the name :)

I've been crocheting some and I even have a friend who's buying some for her swiffer mop :) (the dimensions are different but same idea :)

So wanna make some?

*Start with a slip stitch and chain 50.
*DC in the second chain from hook and *DC across.
*Faux DC (if you dot know how to do a faux double crochet go to YouTube and look it up) and DC across.
(for swiffer mops do 8 rows)
(for Libman mops do 10 rows)

Now you might have noticed its much longer than the mop head. That's on purpose! :) you're gonna center the mop head in the middle of your mop pad and fold over the edges. It'll make a little pocket on each side :)

Starting with the end of the row where your last DC was, SC through BOTH layers and continue across the length of the mop pastille you get to the next "pocket" SC through both layers til edge.

Now in the last stitch SC 3 times and across the back and up the other side same as the other side.

You'll have to finish the first pocket til you come to your first SC. Cut yarn, pull through, and weave in ends :) Tada!

I'll do a full picture tutorial later :)

But for now have a fantabulous day!

Thursday, July 5, 2012

Sally Hansen *hard as nails* powerful acrylic gel

Has anyone had any experience with this????
I love love love LOVE having my nails painted, but unfortunately I am super rough on my hands and it always chips like in as little as a day! sometimes it will last up to 3 but most not so much :(

I painted my nails (french tips) and put this stuff on over them... although I've been reading and people say it works better as a base coat and then paint like normal... so idk...

We shall see! 

I wanted to get "Shellac" but couldn't find it :( so I will be trying this and seeing how it works! hopefully it will help my nails feel stronger and the polish will last much longer! 

I have friend who gets the Shellac manicure and it lasts up to 5 weeks for her!

I don't expect this to last 5 weeks, but I would love it if it lasted at least up to 1! lol :)

I will keep you updated! :)

As of right now, my nails feel stronger (If that's possible) and they're super shinny! I love it! And I hope it lasts! :)

Anyway, leave me a comment if you have had any experience with this stuff and how you liked it and how long it lasted :)

Have a fabulous day!

Wednesday, July 4, 2012

Perfect Homemade McDonalds Carmel Frappe Recipe!!!!


O yes you read that right! :)

A homemade McDonalds frappe recipe that actually tastes like the real thing!!! :)


Just look at this goodness! Are you drooling yet?!
These are your ingredients... Milk, some kind of instant coffee, latte, or in my case cappuccino powder, sugar, and some coffee ice cubes (the coffee ice cubes are made by just pouring freshly brewed coffee into an ice cube tray and freezing it :)


BTW, this makes a size medium drink (16oz)

so one scoop of the instant coffee powder...
then add the ice cubes (depending on how strong your coffee is brewed will determine how many cubes you use... here I'm using 4 cause its not as strong of coffee, usually I use only 3)
Add your sugar, This is optional... I usually only add like a TBSP or so. It doesn't need much :)
add the milk till it reaches just under the 16oz mark you can see the line here...


if not heres the line with my finger. the 16oz line is just above my finger nail
You don't fill it all the way to the 16 oz mark or when it blends up it will be over the 16oz mark and won't all fit into your cup!

*the cup is just one I wash out after every use that I bought from McDonalds*

then blend it all up!
pour it into your 16oz cup...
add whipped cream and carmel and you're done!

O doesn't that look great!!!! Go enjoy!

If you like the mocha instead of carmel, try adding chocolate milk instead of just regular milk, or add chocolate syrup when you're blending it to give the chocolate flavor!


If you're like me and completely addicted to Carmel Frappe's from McDonalds but can't afford to drop a couple bucks on every 1, then this is the perfect solution! I went through a lot of recipes before I found this one! :) it's delish!

Anyway leave a comment if you enjoyed this and have a fabulous day!